RP2040 OLED Macro Pad (Wi-Fi Edition)
A 16-key USB macro pad built with CircuitPython, a 128x64 SSD1306 OLED, a rotary encoder, and an embedded Wi-Fi Web Server. The project is designed around the Raspberry Pi Pico W and is tuned for macOS shortcuts, media controls, and remote web control.
Features
- 4x4 matrix keypad for 16 dedicated macro keys
- Rotary encoder with two operating modes:
- Volume control
- Scroll up/down
- OLED status screen showing:
- Current volume percentage
- Progress bar
- Last action label
- Wi-Fi IP Address
- Wi-Fi Web UI: Control your MacroPad remotely from any smartphone or browser on your local network
- Automatic OLED sleep after 30 seconds of inactivity to prevent burn-in
- Wake-on-input behavior
- USB HID keyboard shortcuts and consumer control media commands
Demo Behavior
When the macro pad is powered and connected over USB: - The device
boots instantly and allows physical control right away. - In the
background, it connects to your Wi-Fi network and starts a local web
server on port 80. - Rotating the encoder in Volume mode
sends media volume up/down commands. - Rotating the encoder in
Scroll mode holds the arrow key briefly for smooth
scrolling. - Pressing a macro key (or tapping a button on the Web UI)
sends the assigned keyboard shortcut or media command. - The OLED
updates to show the most recent action. - The display turns off after 30
seconds of inactivity and wakes up on the next input.
Hardware Used
This project expects the following hardware:
- 1 x Raspberry Pi Pico W (Wi-Fi capability is required for the Web UI)
- 1 x 128x64 SSD1306 I2C OLED display
- 1 x rotary encoder
- 16 x momentary push buttons or keyswitches
- 1 x 4x4 matrix wiring layout for the keypad
- hookup wire
- breadboard, perfboard, or custom PCB
- USB cable for programming and power
Pin Mapping
The code uses the following GPIO assignments:
| Function | Pin(s) |
|---|---|
| OLED SDA | GP0 |
| OLED SCL | GP1 |
| Keypad row 1 | GP2 |
| Keypad row 2 | GP3 |
| Keypad row 3 | GP4 |
| Keypad row 4 | GP5 |
| Keypad column 1 | GP6 |
| Keypad column 2 | GP7 |
| Keypad column 3 | GP8 |
| Keypad column 4 | GP9 |
| Rotary encoder A | GP14 |
| Rotary encoder B | GP15 |
Wiring Diagram
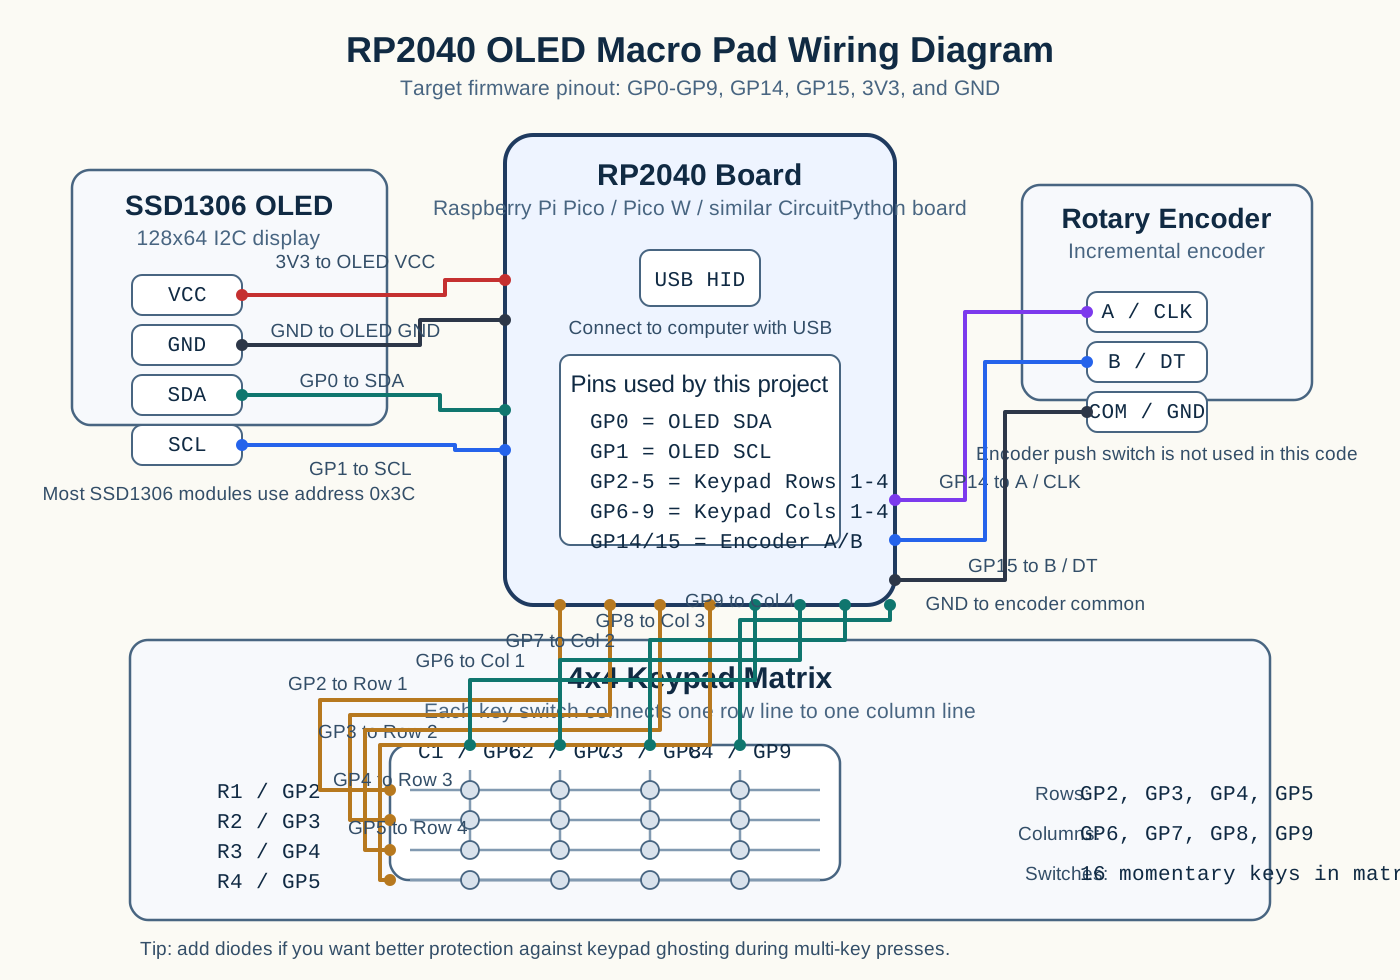
Quick wiring summary:
- OLED
SDA->GP0 - OLED
SCL->GP1 - OLED
VCC->3V3 - OLED
GND->GND - Encoder
A/CLK->GP14 - Encoder
B/DT->GP15 - Encoder
COM/GND->GND - Keypad rows
R1-R4->GP2-GP5 - Keypad columns
C1-C4->GP6-GP9
Software Stack
Firmware
External libraries
required in CIRCUITPY/lib
Copy these from the matching Adafruit CircuitPython Library Bundle:
adafruit_hid/adafruit_ssd1306.mpyadafruit_bus_device/adafruit_framebuf.mpy
Installation
1. Install CircuitPython on the Pico W
Install a current CircuitPython release for your Raspberry Pi Pico W,
then reconnect it so it appears as the CIRCUITPY drive.
2. Configure Wi-Fi Credentials
Open code.py in a text editor and update the
WIFI_SSID and WIFI_PASS variables to match
your home network:
WIFI_SSID = "Your_SSID"
WIFI_PASS = "Your_Password"
3. Install the required libraries
Download the Adafruit CircuitPython Library Bundle that matches your
major CircuitPython version. Inside the extracted bundle, copy the
adafruit_hid/, adafruit_ssd1306.mpy,
adafruit_bus_device/, and
adafruit_framebuf.mpy items into
CIRCUITPY/lib.
4. Copy the code
Copy code.py to the root of the CIRCUITPY
drive.
Default Key Map
The keypad is scanned as a 4x4 matrix. The following layout is assigned and mirrored perfectly on the Web UI:
| Row | Col | Action | Output |
|---|---|---|---|
| 1 | 1 | Previous Track | Media previous track |
| 1 | 2 | Play/Pause | Media play/pause |
| 1 | 3 | Next Track | Media next track |
| 1 | 4 | Mute | Media mute |
| 2 | 1 | Workplace Right | Ctrl + Right Arrow |
| 2 | 2 | Quit App | Cmd + Q |
| 2 | 3 | Dictation | Double tap Ctrl |
| 2 | 4 | Toggle Encoder Mode | Switch between Volume and Scroll |
| 3 | 1 | Screen Snip | Cmd + Shift + 4 |
| 3 | 2 | Copy | Cmd + C |
| 3 | 3 | Paste | Cmd + V |
| 3 | 4 | Undo | Cmd + Z |
| 4 | 1 | Switch Tabs | Ctrl + Tab |
| 4 | 2 | Zoom In | Cmd + = |
| 4 | 3 | Zoom Out | Cmd + - |
| 4 | 4 | Desktop | F11 |
Web UI
Once the device connects to Wi-Fi, the OLED will display its IP
address (e.g., 192.168.1.100).
Open that IP address in any web browser on the same network to access the MacroPad Web UI. From this interface, you can trigger any macro button or adjust the volume remotely. The Web UI syncs live with the physical pad, updating the currently displayed action and volume slider dynamically using AJAX polling.
Customization Guide
Change a macro
Edit the matching block inside the execute_action()
function:
elif action == "COPY":
    kbd.send(Keycode.GUI, Keycode.C)
    last_action = "COPY"
To assign a new shortcut, replace the kbd.send(...) keys
and update the last_action string.
Change display sleep time
Edit this constant:
SLEEP_DELAY = 30